THE MASONRY Isopod Kit — Start Your Tiny Roly‑Poly Farm
A compact, beginner-friendly kit that bundles everything you need to start a tiny, display-ready isopod colony
Want a low‑maintenance, desk‑friendly pet that doesn’t need walks or litter boxes? Finding the right substrate, calcium, moss and a safe container can be confusing — and buying everything separately gets messy and expensive.
THE MASONRY Isopod Terrarium Starter Kit bundles the essentials into a clear acrylic display terrarium with a care guide, leaf litter, soil base, moss and calcium. At $28.99 it’s a compact, beginner‑friendly solution that makes setting up a small isopod colony quick and fuss‑free (just watch the limited footprint and be gentle with the acrylic).
Beginner-Friendly All‑In‑One Kit
THE MASONRY Isopod Terrarium Starter Kit
Perfect starter kit for budding isopod keepers
8.7/10
EXPERT SCORE
This kit delivers almost everything a beginner needs to start and maintain a small isopod colony with minimal fuss. It balances convenience, thoughtful contents, and clear instructions in an attractive, compact package.
Comprehensive starter contents (soil, moss, leaf litter, calcium, care guide)
Clear acrylic terrarium with secure lid — compact and display-friendly
Designed specifically for isopods and other small invertebrates
Easy, beginner-friendly setup and care instructions
Compact size fits apartments, classrooms, and small desks
Cons
Small 8″ x 4″ x 4″ footprint limits colony size and long-term expansion
Acrylic is prone to scratches—requires careful handling
Secret to Building the Best Isopod Colony — Giveaway
Overview
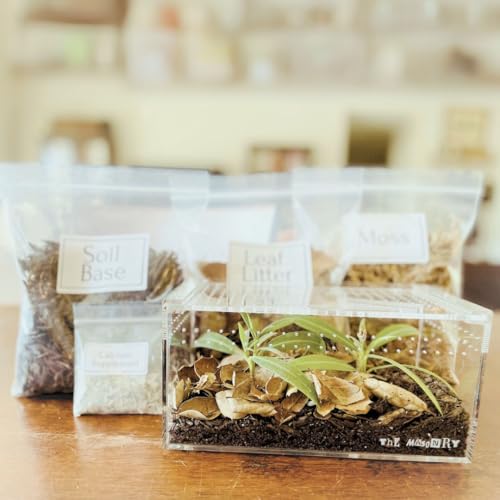
The THE MASONRY Isopod Terrarium Starter Kit is a compact, all-in-one package designed to get beginners up and running with roly poly (isopod) care. The transparent acrylic terrarium and curated accessory set — leaf litter substrate, soil base, sphagnum moss, and calcium flakes — let you create a functional microhabitat right out of the box. The kit is aimed at hobbyists, classrooms, and anyone curious about keeping small invertebrates.
What’s in the Box
Acrylic terrarium (8″ x 4″ x 4″) with ventilation lid and clasp
Pre-measured soil base and leaf litter substrate
Small packet of sphagnum moss for moisture retention and hiding spots
Calcium flakes for supplementation
Illustrated care guide and setup tips
First Impressions and Build
The terrarium itself is made from clear acrylic — lightweight and visually pleasing for display. The lid snaps on securely and includes ventilation to maintain airflow while preserving humidity. The included substrates are pre-portioned, making first-time setup quick and predictable.
The acrylic offers excellent visibility for observing isopod behavior but is more prone to surface scratches than glass. The size is intentionally small to simplify maintenance and reduce the number of animals recommended for the enclosure.
Step-by-Step Setup (Beginner-Friendly)
Choose a stable, low-light location that avoids direct sunlight.
Layer the included soil base evenly across the floor of the terrarium.
Add leaf litter in patches to create natural muk and hiding places.
Place sphagnum moss in damp clumps to help retain moisture and offer microclimates.
Sprinkle calcium flakes in a shallow dish or mixed lightly with the substrate for supplementary nutrition.
Add a few hiding structures (rocks, cork bark) if you have them, then introduce a small number of isopods (start with 5–10 for this size).
Habitat Tips and Maintenance
Maintain slightly damp (not saturated) substrate; mist lightly 2–3 times per week depending on room humidity.
Keep temperatures stable: typical household temps (65–75°F / 18–24°C) are fine for most common isopod species.
Remove uneaten food and visibly moldy material to prevent fungal overgrowth.
Rotate leaf litter and top up substrates periodically to maintain a nutrient-rich environment.
Who Is This Kit Best For?
Beginners who want a low-barrier entry into invertebrate keeping
Teachers seeking a small educational habitat for classroom observation
Hobbyists who want a display tank for a small colony, or to acclimate juveniles
Size & Capacity Table
Specification
Detail
Terrarium material
Acrylic
External dimensions
8″ x 4″ x 4″
Recommended initial isopods
5–10
Intended use
Short-term display / starter colony
Pros: Practical Details
The pre-packaged substrate and moss remove guesswork for first-time keepers.
Calcium flakes help prevent common deficiencies and are easy to offer in a shallow dish.
The clear walls provide unobstructed viewing for behavior observation and educational use.
Compact footprint makes it a good apartment or desk terrarium where space is tight.
Cons: Things to Consider
Long-term growth of a colony will require a larger enclosure and additional substrate refreshes.
Acrylic’s scratch susceptibility means cleaning should use soft cloths and non-abrasive solutions.
The kit does not include live isopods — you’ll need to source a starter group from a reputable seller or local collection, observing biosecurity and species legality where applicable.
Practical Accessories You Might Add Later
A shallow feeding dish for vegetables or calcium powder
Cork bark or small slate tiles to expand hiding and humidity gradients
A hygrometer to track humidity in climates that swing dry
Additional leaf litter from untreated sources to broaden microfauna diversity
Care Timeline: What to Expect in the First 3 Months
Weeks 2–4: Microhabitat stabilizes; you may see detritus breakdown and small mold patches — normal if managed.
Months 2–3: Isopods should begin breeding in a stable, nutrient-rich setup; consider how you will expand the colony if desired.
Final Thoughts
This kit is a thoughtful, low-stress introduction to keeping isopods and creating a functioning micro-ecosystem. It keeps focus on the essentials—adequate substrate, humidity retention, and calcium supplementation—without overcomplicating setup for newcomers. While the size limits long-term colony expansion, the kit excels at education, observation, and short-term husbandry.
If you plan to scale to larger colonies, consider this a launchpad: the included components will still be useful as you graduate to larger acrylic or glass vivaria and add more complex decor and monitoring tools. For beginners, classroom educators, or small-space hobbyists, it offers a tidy, mostly complete way to start exploring detritivore husbandry.
Yes. The kit supplies habitat materials and instructions but not animals.
You can obtain isopods from these sources:
Local breeders or isopod hobby groups.
Reputable online sellers with live-animal feedback.
Some independent pet stores that specialize in invertebrates.
Wild-caught animals can carry parasites or pesticides. Quarantine new animals for a week or two to watch for signs of disease. Also check species suitability for your enclosure and climate before buying.
How many isopods can this terrarium comfortably support?
Start small in the 8″ × 4″ × 4″ enclosure. A recommended initial group is 5–10 adults.
This keeps humidity, food, and waste levels manageable.
Juveniles will increase population quickly, so avoid overstocking.
Signs of overcrowding: persistent mold, many dead animals, escaping, or depleted food.
If you want a larger colony, move to a bigger tank before adding many more.
What food should I offer and how often?
Feed detritus and soft vegetable matter. Offer small amounts so food is consumed within a few days.
Leaf litter: oak, beech, maple, and well-aged dried leaves work well. Avoid leaves from treated trees or black walnut.
Veggies: small pieces of carrot, squash, sweet potato, or blanched spinach.
Calcium: crushed cuttlebone, calcium flakes, or finely ground eggshells for shell health.
Occasional protein: tiny pinches of fish food or leaf-litter with fungal growth; not required daily.
Remove uneaten fresh food after 48–72 hours to prevent mold. Feed lightly 1–3 times per week depending on colony size.
Can this kit be used for other small invertebrates?
Yes. The setup suits many small detritivores and microfauna, but check each species’ needs first.
Common compatible animals: springtails, small soil-dwelling beetles, dwarf isopods, and micro-annelids.
Not all species mix well; avoid combining unknown or aggressive species that might prey on each other.
Match humidity, substrate depth, and food requirements before adding a different species. Quarantine new additions to prevent pests or pathogens.
How do I keep humidity without making the tank too wet?
Use the included sphagnum as a moisture reservoir and mist rather than pouring water.
Aim for slightly damp substrate, not saturated soil.
Mist every few days or as needed; frequency depends on room temperature and ventilation.
Use a small hygrometer to target roughly 60–85% relative humidity for many isopod species.
Place hidden damp spots (under cork or bark) so animals can choose microclimates.
If you see constant beading of condensation, open the lid or prop it briefly to lower humidity.
Is acrylic safe for long-term isopod housing?
Yes, acrylic is non-toxic and lightweight, so it is fine for small colonies and display tanks.
Pros: clear, light, and easy to handle.
Cons: scratches more easily than glass, can build static dust, and may yellow slowly with UV exposure.
Avoid harsh solvents when cleaning. For larger or long-term breeding colonies, consider thicker acrylic or glass for durability and easier maintenance.
How often should I refresh substrate or leaf litter?
Top up leaf litter regularly as it decomposes, and do partial substrate refreshes instead of full replacements when possible.
Top off leaf litter: every 4–8 weeks for small enclosures.
Partial substrate refresh: stagger portions every few months to preserve beneficial microbes and microfauna.
Full substrate change: usually only needed every 6–12 months or if contaminated.
Compost or reuse spent leaf litter in outdoor gardens if it is pest- and disease-free.
Can I add plants to this terrarium?
Yes. Small, humidity-tolerant plants work well and add hiding spots and microclimates.
Good choices: small ferns, Fittonia (nerve plant), Pilea depressa, and various mosses.
Plant tips: use low-nutrient soil, avoid chemical fertilizers, and choose shallow-rooted species.
Be aware that isopods will nibble some plants or disturb roots.
Planting in a small pot or using barriers can protect roots while still giving the terrarium a living look.
Emily Stevens
Emily is a passionate pet care expert and the voice behind Pet Wool Bed.
42 Comments
I noticed the terrarium lid lock is a tiny bit fiddly — maybe my hands are clumsy lol. Also, the care guide mentions humidity but doesn’t give exact RH targets. Could be more specific.
Ohhh a hygrometer — I didn’t think of that. Adding to my cart!
Thanks, Anita. We try to keep the guide approachable but will consider adding specific humidity ranges in future updates (generally, many isopods do well around 70–85% RH depending on species).
Same here, the latch felt stiff at first. A little silicone lubricant on the hinge helped me.
70–85% is a good ballpark. I use a small hygrometer when I switch species to be safe.
Hygrometers are inexpensive and useful. Thanks for the feedback about the lid — we’ll pass that along to the product team.
Just got one of these as a gift for my kid’s birthday — super cute setup. The acrylic terrarium feels sturdy and the guide is easy to follow. A few notes: the substrate bag was a bit compressed but revived after a day. Overall happy for the price.
Nice — I love that it’s beginner friendly. Thanks for the tip about fluffing the substrate.
Good to know — I was worried the soil would be unusable if flattened. How many isopods did you start with?
I started with 6 that I sourced locally. They’ve already been hiding in the moss 😀
Thanks for sharing, Emma — glad it arrived in good shape! If the substrate looks compacted, gently fluffing it and slightly misting (not soaking) usually helps rehydrate the leaf litter and moss.
Neutral take: good kit for beginners but avoid expecting to breed huge colonies out of the box. The size (8″ x 4″ x 4″) is cute but small — ideal for observation rather than serious breeding.
Good to know ahead of time — thanks for the reality check.
That’s a helpful point, Robert. The kit is aimed at starters and small educational setups. For breeding larger populations, a bigger tank and extra substrate are recommended.
Agreed. I started in a small tank and moved to a 20-gallon later when the colony grew.
Price seems fair for what’s included, but I’d like more info on ventilation. The lid looks pretty secure — will that hold up long-term or should I add small holes?
Bought this as a curiosity purchase. Setup took under 20 minutes and my kids love watching them. A couple of suggestions for buyers:
1) Buy extra leaf litter/moss if you want a fuller look.
2) Get a small spray bottle for misting.
3) Consider a tiny hide (cork bark) to increase activity.
Small kit, big entertainment value. 🙂
Great suggestions, Zoe. Cork bark or small hides really do stimulate natural behavior and provide shelter for the isopods.
Any brand recs for spray bottles? Looking for something that gives a fine mist.
Seconding the spray bottle — makes humidity control so much easier.
Okay this is going to sound dramatic but: I didn’t expect to feel joy over little roly-polies. The terrarium looks pretty on my shelf and the care guide made setup painless.
Pros:
– Compact and clear acrylic
– All-in-one components
Cons:
– Wish there were more moss included
Overall, 8/10 from me!
Love the enthusiasm, Sarah! We noted your point about the moss — thanks. You can usually supplement with store-bought sphagnum if you want more coverage.
Thanks for the breakdown — I like the pros/cons format!
Local garden center had small packs that worked fine. Also, backyard peat-free moss in my area did the trick.
Gives me shelf vibes too. Where did you buy extra moss? Local garden store or online?
8/10 seems fair. I’m tempted to get one just to be dramatic and claim I run a tiny roly-poly startup 😂
Same — I ran out of moss after a month. Bought extra and it made a big difference.
Love the novelty. Would be fun for classroom demos. Quick note: packaging was recyclable which I appreciated — small win for the planet!
Fantastic — glad you noticed the packaging. We’re trying to strike a balance between protection in shipping and sustainability.
Does anyone know if this kit is safe for other small inverts (springtails, tiny spiders)? The description says ‘intended for invertebrate use only’ but that’s vague.
I keep springtails alongside my isopods — they help keep things tidy. Just don’t add big predators.
Good question. The kit is designed primarily with isopods and similar detritivores in mind; springtails are often a helpful addition as they assist with mold control. I wouldn’t recommend housing predators like spiders with isopods unless you’re intentionally creating a mixed setup and understand the risks.
Packaging arrived intact, instructions were clear, and the calcium flakes are a nice touch. Minor gripe: the leaf litter scent was stronger than expected (maybe natural tannins?). It faded after airing out though.
Thanks for the note, Laura — natural leaf litter can carry earthy scents. Airing it for a day before final setup is a good practice if it concerns you.
If anyone’s sensitive, spread the litter out on newspaper for a day to let it breathe.
Yep, airing helped for me too. No lasting smell.
The kit came with calcium flakes which I appreciated. Quick question: how often do you folks feed the isopods? I don’t want to overdo it.
Great question, Priya. For a small starter colony, feeding once a week with a small pinch of vegetable matter or a tiny bit of fish food is usually enough. Remove uneaten food after a day or two to prevent mold.
I feed mine once a week and rotate between carrot slices and leaf litter bits. Less is more — they’ll survive longer than you think.
Funny little product. If you’re expecting to solve all your classroom biology needs with roly-polies, temper expectations 😂. That said, good starter kit and the acrylic makes them easy to observe up close.
Agreed — but they’re surprisingly educational. I used one in a lesson about decomposition and nutrient cycling.
Haha — fair point, Oliver. They’re great for observation and simple ecology lessons, but not a replacement for full-scale lab setups.