Quick, Calm, Safe: Why This Guide Matters
This friendly primer helps you clip budgie wings SAFELY to reduce flight risks without stressing your bird, showing when to clip, how much to trim, and how to proceed gently and responsibly with calm confidence.
What You’ll Need

How to Trim a Budgie’s Flight Feathers Safely and Effectively
Step 1 — Decide If Clipping Is Right
Is clipping cruel — or the kinder option? Ask these honest questions first.Decide whether clipping is right for your budgie before you touch a feather. Weigh the pros and cons and think about health, flight environment, and behavior.
Consider these points:
Plan for periodic maintenance (many birds need trims every 6–8 weeks) and accept reduced escape ability. If you’re unsure, consult an avian vet or experienced breeder for guidance.

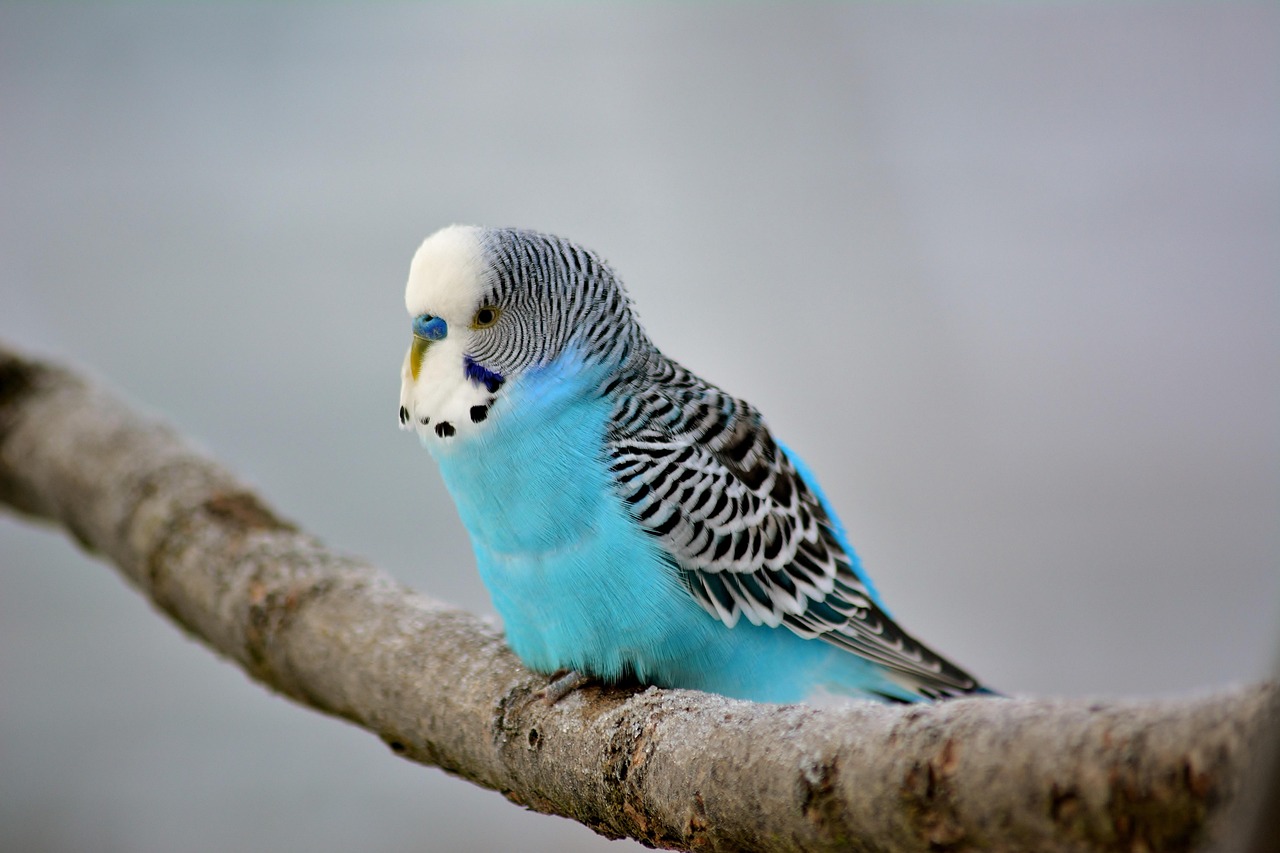
Step 2 — Learn Budgie Wing Anatomy
Know which feathers matter — you’ll only trim a few, not the whole wing.Identify the main feather groups before you touch a single feather. Recognize primaries, secondaries and the alula so you know what to avoid.
Understand moulting: birds replace feathers in stages. Avoid clipping during a heavy molt or when you see new blood feathers (shiny, darker shafts or a feather in a sheath). Mark a safe trimming zone on photos or diagrams first, then practice identifying those same feathers on a calm bird before any cutting.
Step 3 — Prepare Your Space and Budgie
Set the scene: less panic, more biscuits — calm birds clip better.Choose a quiet, warm room with soft flooring. Pick a carpeted bedroom or bathroom with towels on the floor so the bird won’t hurt itself if it slips. For example, a 75–80°F, low-traffic room works well.
Recruit one helper to gently hold the budgie while you work. Bring a few favorite treats to reward calm behavior.
Prepare these items:
Wrap the budgie snugly in the towel like a small burrito, leaving one wing exposed. Inspect the exposed wing for dirt, mites, broken or bloody feathers; postpone clipping if feathers look damaged or the bird seems unwell.
Step 4 — The Clipping Technique
Steady hands, small snips — less is more. One cautious clip beats a frantic trim.Use sharp, clean scissors or small clippers and sanitize them first.
Hold the wing flat and extend it gently so you can see the primary feathers.
Trim 1–3 outer primary feathers from each wing depending on the look you want — for example, trim 1 feather for a subtle reduction, 2 for moderate, 3 for more restriction.
Cut only the non-blood feather vane — never cut into the quill or near blood feathers.
Remove one feather at a time, cutting a little below the vane edge so the hollow quill remains intact.
Check balance by letting the budgie perch between trims.
Stop immediately if the bird bleeds, struggles excessively, or shows signs of shock; apply styptic powder and seek help if needed.

Step 5 — Immediate Aftercare and Observation
What to watch for in the first 24 hours—surprising signs you shouldn’t ignore.Place the budgie in a small, safe area right after clipping, for example a travel carrier or a cage corner lined with a towel. Offer fresh water and a favorite treat like millet to calm it.
Watch balance, breathing, and behavior for stress or bleeding. Check perching by letting the bird hop briefly onto a finger or low perch.
Monitor for these warning signs and act fast:
Record the date and which feathers you clipped (e.g., outer primaries 1 and 2 on both wings) for future reference.

Step 6 — Long-Term Care and Alternatives
Think beyond scissors: training, harnesses, and vet advice can change everything.Plan regular checks and trims tied to your budgie’s moult and activity. Check feathers every 6–8 weeks and after any full moult — for example, if your budgie moults in spring, inspect then and only trim if necessary. Consult your avian vet for the first clip or whenever you feel unsure; ask them to demonstrate the technique.
Consider behavioral alternatives: train reliable recall, use a flight harness for supervised outdoor time, or set up a supervised free-flight room so your bird can exercise safely.
Support long-term safety with:
Keep social enrichment, exercise, and cage safety as long-term strategies to reduce the need for clipping.

Final Thoughts
Clipping can be done humanely with preparation, patience, and safety-first thinking; if unsure, ask an avian vet or experienced breeder to demonstrate before you try it yourself — ready to learn and protect your budgie?


Super helpful! I clipped my budgie last month following the clipping technique and it worked out great 😊
I messed up the first time trimming too much (rookie mistake lol) but the immediate aftercare tips helped stop the bleeding fast.
One small note: maybe add pics for where to stop? I know the guide describes it but pics would help so much.
Yes pls add pics! A closeup of the wing spread and which feathers are safe to trim would have saved me from over-trimming the first time 😅
If you don’t have pics, a magnifying light helps a lot so you can see the quill base. Also, trim tiny amounts and test flight after each small trim — better safe than sorry.
Thanks for sharing, Ava — glad it went well after the first try. Excellent suggestion about photos; I’ll work on adding annotated photos/diagrams to the clipping section so beginners can better visualize where to stop.
Good guide overall but the clipping technique felt a bit vague for beginners. ‘Trim the outer primaries’ is not a ‘one size fits all’ instruction.
Would be great to have a short checklist of exact feather counts or a simple diagram.
Also, you might stress vet-first more — I know people who DIY’d and ended up needing care.
Thanks Marcus — valid point. We’re planning to add a simple checklist and a labeled diagram showing which feathers are typically trimmed and how much. And yes, we’ll emphasize consulting an avian vet if you’re unsure or if your budgie has medical issues.
For what it’s worth: when I started I only trimmed 1-2 outer primaries per wing and tested the bird’s balance/flight between trims. Slow and small increments are your friend.
Love the ‘Quick, Calm, Safe’ title — as if my budgie ever cooperates lol.
Read steps 3-6 and laughed at the ‘prepare your space’ bit because my bird insists on pooping everywhere.
On a serious note: alternatives section was gold. Tried a tiny harness last year and it saved our sanity. Not for everyone tho.
One tiny critique: maybe add a bit more about long-term behavior changes after clipping? Mine got clingy for weeks.
Also, that karate-chop move when they flap? Not recommended 😂
If you go the harness route, introduce it in tiny stages — leave it near their food, let them explore it, then do tiny seconds of wearing until they don’t mind. Rushing makes them hate it.
Harsh truth: budgies are drama queens. 😂 But real tip — slowly rebuild confidence with flight practice in a safe, enclosed room. Don’t overdo it; short sessions daily worked best for us.
Yep, my bird got more vocal and wanted to be on my shoulder way more after being clipped. Lots of enrichment toys and short supervised out-of-cage time helped reduce the clinginess.
Also, consider rotating perches and toys after clipping. New textures and foraging puzzles can shift their focus from ‘why can’t I fly’ to ‘what’s this tasty thing?’
So glad you liked the alternatives section, Ruth — harnesses can be brilliant if introduced gently. Great point about behavior changes: we’ll expand the long-term care section with more notes on increased clinginess, confidence-building exercises, and enrichment ideas to help them adjust.
Clear guide. Quick Q: aftercare signs — what exactly should prompt an emergency vet visit? The ‘observation’ bit is helpful but a short list of red flags would be great.
Thanks!
Good call, Owen. Red flags to seek emergency care: heavy bleeding that doesn’t stop with pressure/cornstarch, pale or white gums/combs, labored or open-mouth breathing, sudden collapse/unresponsiveness, signs of severe pain (continuous vocalizing, fluffed and hunched). If you’re unsure, call an avian vet — better safe than sorry.
Also add: if the bird starts disoriented or shows head tilting after handling, get them checked. Those can be subtle but important signs of trauma or shock.
Really appreciate this guide — came across it while panicking about my budgie zooming into the ceiling fan last week.
The step-by-step flow made sense and the emphasis on calm prep was spot on.
Quick question: how can I tell if a feather is a blood feather during a molt? I read the guide’s anatomy section but still nervous.
Also, any tips for keeping them calm while you do the clipping? My bird flips out even with treats.
Thanks!
Great question, David. Blood feathers are usually darker at the base and feel a bit thicker — you can sometimes see the blood supply inside the quill. The guide’s Step 2 mentions them; if you see any dark/red at the base or the bird is molting, avoid clipping that feather and consult a vet. For calming: soft voice, dim light, short practice sessions over several days before attempting the clip.
I had the same worry. When in doubt I wait until the molt is done — it’s worth a few extra weeks. Also wrapping them gently in a towel (be careful with breathing!) and using a calm, quiet room helped my budgie relax.
Tip: do the clipping in the morning after their first preening — they’re usually calmer and a bit sleepier. Also try letting them preen you a bit first so they feel bonded before you handle them.
If you spot a blood feather and it gets accidentally nicked, apply styptic powder or a little cornstarch and pressure, and call the vet right away if it doesn’t stop. I know it’s scary but most of the time quick aftercare does the trick.